I've been imagining the water marble effect on my nails for quite some time, so I decided to finally give it a try. It's the second time I've tried it and I like the effect, but the stamping technique still remains my favourite one.
First I decided on the colours- I wanted a mixture of pastels and a neon, but in the end I chose a sparkly one too (color club youthquake, sally hansen I lilac you, golden rose 44 and savina fairy dust + seche vite on top)
I polished all my nails twice with a base colour (white - Bell).
I then applied vaseline on my cuticles and my fingers up to the first joint as well as underneath my nails. The whole process causes a lot of mess, so it's better to prepare your fingers as best as possible. I prepared a jar of room temperature water and opened all my bottles of polish. You need to have everything ready as it's best to make it quickly, so that the polish doesn't dry. I dripped one drop of polish each time forming a bull's eye. It is important to choose such polish which would spread over the surface of water instead of sinking. I repeated the action twice with each polish (having altogether 8 drops of polish every time I began the water marble in my jar. I used a toothpick to prepare the design I wanted (or rather was able to make). I put my finger inside (the nail should be facing the design) and afterwards I picked the remains with a toothpick. At last I took the finger out of the water.
The effect was really nice but messy. So I cleaned my fingers and cuticles with a remover. I used a flat brush to clean my cuticles.
piątek, 29 stycznia 2016
środa, 27 stycznia 2016
colourful flowery stickers
I wanted something very colourful, with a lot of sunny energy and so I chose to colour the prints of my stickers.
I chose a variety of colours and a stamping plate which had one dominant flower on it.
I painted all my nails with a white base.
Then I put transparent polish on a piece of plastic foil. Then I stamped the image of the flower on the foil, under which I put a copy of nail images. When it was dry I began the colouring process.
When the stickers were nearly dry, I applied them gently on my nails, cutting the edges with scissors and filing them with a nail file. On top, I used the sally hansen insta dri top coat.
I chose a variety of colours and a stamping plate which had one dominant flower on it.
I painted all my nails with a white base.
When the stickers were nearly dry, I applied them gently on my nails, cutting the edges with scissors and filing them with a nail file. On top, I used the sally hansen insta dri top coat.
A different kind of French Manicure
I really wanted to have a nice french mani, but not the typical one, but something a bit different. Once again I wanted to use my stamping plates, which I adore more and more every day.
I decided to focus just on one colour this time (white) and so I used the seche porcelain for the stamping and later on for the ombre. My base polish was at the same time my top coat :-)
I used an image of an interesting lace for my stamping process.
I added a bit of the indigo mermaid effect just on the tips of my nails.
Then I used a sponge for the ombre - here again I applied both the transparent polish and the white seche. The effect was just as I expected :-) At the end I put a coat of the seche vite to dry my nail art quicker :-)
poniedziałek, 25 stycznia 2016
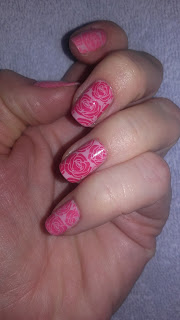
Roses, everywhere roses...
As you know, I mostly admire the floral nail art, especially the one with roses. And so this time, once again, I chose the born pretty plate with beautiful flowers.
I used the color club polish called "get a clue" as a base polish (two coats). I chose three different colours for the stamping process -the watermelon candy pink from color club, the fuchsia flare and pink blink from sally hansen insta dri.
The final look is ok, though I think the watermelon candy pink wasn't the best choice as it is a bit too bright.
Subskrybuj:
Posty (Atom)


